The Net Control Manager (NCM) program was designed to make Amateur Radio Net check-ins, management of net resources and net reporting easier and more efficient than using pen and paper. This is not meant however to be a replacement for pen and paper, which will always be your best backup should something go wrong.
The NCM is designed to make ARES, RACES and other EM net logging and reporting as easy and intuitive as possible. But of course works perfectly with your weekly club social net as well. Its many features are aimed squarely at these ideas.
NCM was also designed to be easily usable by the Net Control Operator (NCO) alone, however someone else keeping log while you control the net is always a good idea. I suggest you keep it open on your computer as you call the net. Set the timed refresh to 5 or 10 seconds. If the NCO is also the logger, do NOT set a timed refresh value.
Using NCM like any application of this type should be practiced. Go ahead and create a TE0ST net from the drop down. Add stations, delete stations, sort columns, edit fields, do all the things you would do during a real net. Then when you are complete be sure to close your net. This net will stick around for a while so come back and play with it more, re-open the net (right click the 'Net Closed' button) add some more calls, etc.
OS and Browser Considerations for NCM:
(basically a modern browser is required)
Good Edge
Better Safari
Best Firefox
Usually OK Chrome
*Turn on popups for NCM
Popups... NCM works best with popups enabled in your browser. Many features require popups to display additional information. There are NO, None, Zero, Zip ads in this application and never will be.
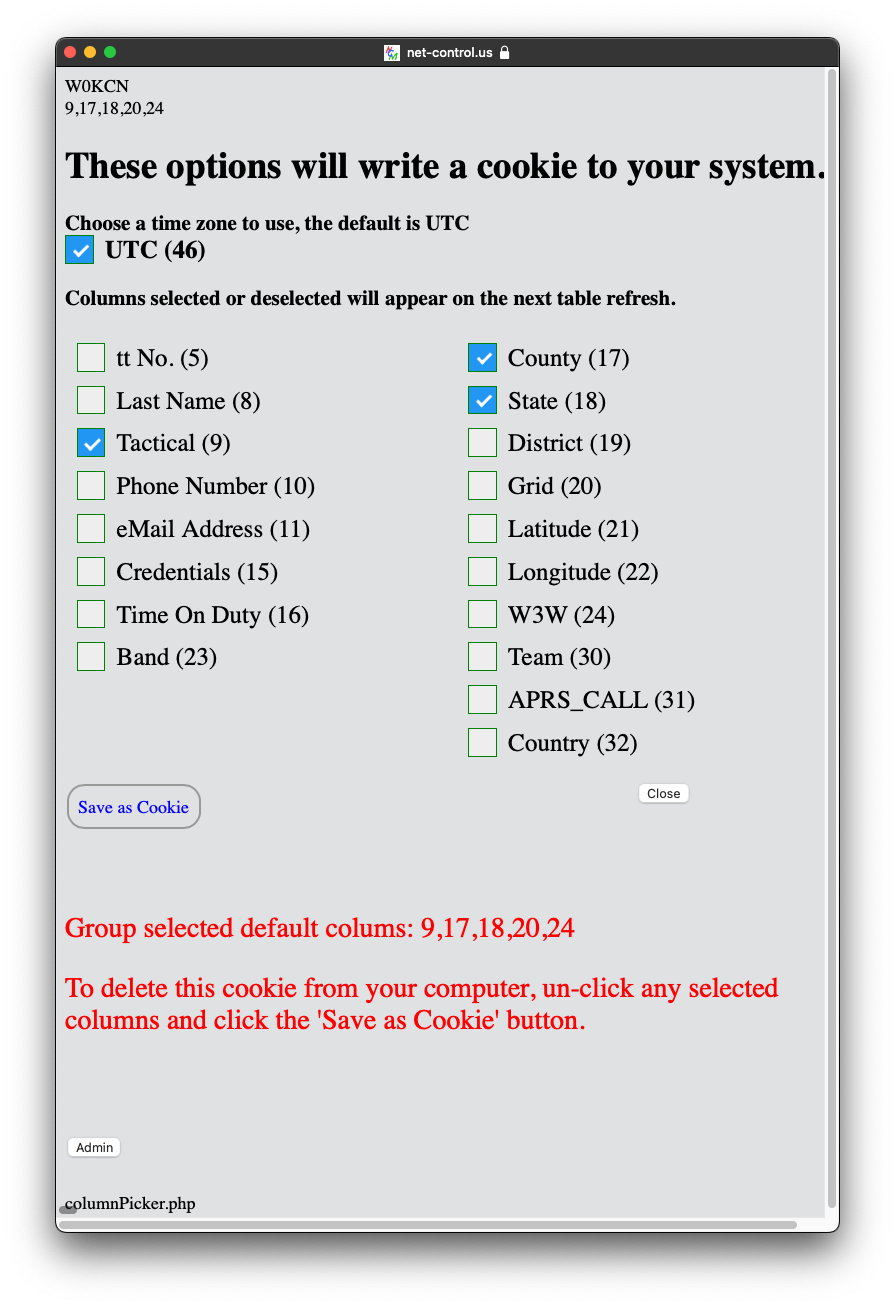
Cookies... I don't like them. But in some circumstances (which you as a general user may never see) NCM does set a cookie. Even then its voluntary via a button that says "Save as Cookie". If you never see that button, then a cookie will never be set, if you see it then the choice is yours. Despite what you may have heard, cookies are safe, very small text items added to your computer to assist with web pages. If you choose to see only the County and State optional fields that cookie would only have 5 bytes and would look like this (17,18).
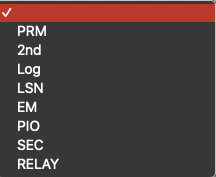
NCM - Net Control Manager NCS - Net Control Station (PRM) NCO - Net Control Operator EOC - Emergency Operations Center ARES - Amateur Radio Emergency Service RACES - Radio Amateur Civil Emergency Service CERT - Community Emergency Response Team NWS - National Weather Service ICS - Incident Command Structure SATERN - Salvation Army Team Emergency Radio Network
APRS - Automatic Packet (Position) Reporting System APRSC - Amateur Radio Public Service Corps NTS - National Traffic System SkyWarn - Weather Nets DTMF - Dual Tone Multi Frequency (touch tones) APRStt - APRS via DTMF tones EM - Emergency Management FCC - Federal Communications Commission MARS - Military Auxiliary Radio system W3W - What3Words POI - Point of Interest
For any new net created most columns are filled by values that come from one of two places. Most station values are picked up from the 'stations' table. Others default to values based on the FCC data base. The FCC data base is only queried the first time a station logs in, just that once. All other default values are from the stations table of the NCM data base.
All times are stored as universal time (UTC). You are able to select the local time zone for display purposes only.
County, State, District, Latitude, logitude and gird: at the beginning of any net will always default to the stations home address.
Call sign, First and Last Name, phone number, email address, and Credentials are all stored for the open net only. When changed they will NOT be retained for future nets.
The most significant change (my opionion) is in the use of the APRS_CALL and W3W columns. Clicking in the APRS_CALL allows you to enter the callsign this users is beaconing his radio on. For example my truck beacons APRS as WA0TJT-1, a right click here opens a dialogbox with three options; a simple move station request, a comment on an object, or an actual object such as 'tree on house'.
The W3W field when (left) clicked brings up a similar dialogbox with the same options, for the What3Words you enter in the appropriate field.
Check out the full usage instructions W3W - What3Words
GMRS callsign look-up is also in the works and should be available in the near future.
Individual Activity Log (ICS-214A)
This report is displayed as a pop-up modal when you right click in the 'Time Line Comments' column of any row. It is a personal ICS-214 just for that callsign, easily printable or it can be saved as a PDF by your browser.
Reload your screen (page reload): The blue 'refresh'
button only does a content refresh not a page reload.
Be sure you have recently reloaded your entire screen if you can't find something or if something doesn't seem to work correctly.
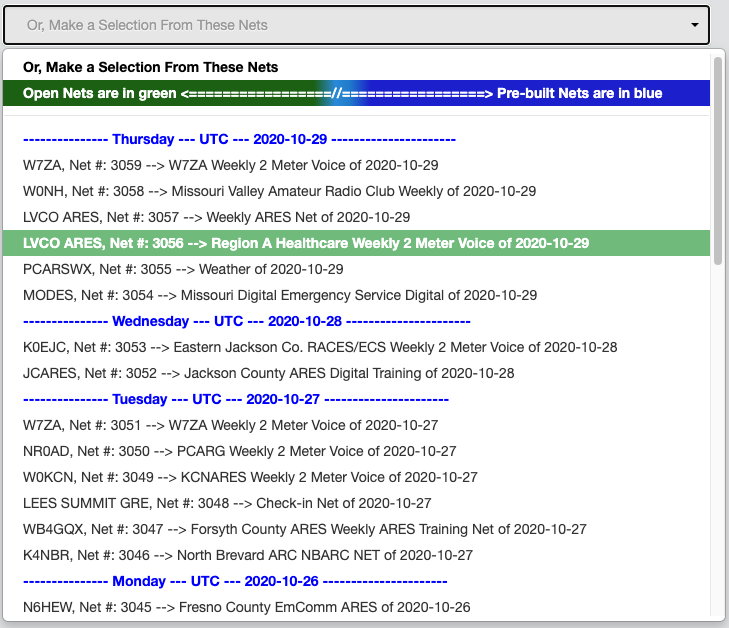
Before starting a new net, be sure someone hasn't already started it. Check the dropdown for a green (open) or blue (pre-built) net.
If you are monitoring the net, set your refresh to a "Timed" number of seconds.
If you are net control and NOT keeping the log, set your refresh to 5 seconds.
If you are the logger but NOT net control leave the default (Manual).
If you are both leave the default (Refresh or Manual).
Entering Station call signs (There are a number of possible ways to do this.) All entries can be done with a TAB TAB TAB (triple tab) after entering a call sign only. It's never necessary to enter a name for a valid callsign.
If your group is not yet in the dropdown list when creating a new net, choose the hamburger menu in the upper right corner and select 'Create a new Group' from the dropdown. You can build your new group here. Be sure to refresh the page before trying to open a new net using your new group.
For smaller screens learn to use the Windows commands 'Control +' and 'Control -' or Mac commands 'Command +' and 'Command -' to fit the content to your monitor.
Nets marked with "Net Closed" can not be edited. You must re-open it first.
To enter a line break (carridge return) to the 'Comments' field put <br> or simply space twice where you want the break. Then continue to type. Do not use the return on your keyboard. All simple HTML markups are available to use.
Entering NON-Hams into the system. To do this use the call sign NONHAM or EMCOMM and put both the first name and last name (if you have them) into the 'Name' box. The system will make an appropriate entry. GMRS licenses can also be entered, however their owner will be the only station identified. This is not in place yet but is coming. For additional users of the same call, I suggest adding a -1, -2, etc. to the parent call.
Late Check-Ins (after log is closed). The best thing to do is enter them as an 'In-Out' in the 'Status' column. This will assign a one-minute value to TOD. But more importantly it will allow your log to close properly.
Duplicate calls are not allowed and will be ignored by the system. However if you have chosen 'Multiple Bands' or '80/40 Meters' as your frequency while building the net, they will be allowed. Its hoped you will indicate which band they checked in from using the 'Band' column. The 'Band' column will be automatically added if you choose one of the above frequencies.
Have fun!
If you have an idea how to improve Net Control Manager, please send them to Keith Kaiser my eMail address is wa0tjt@gmail.com
One of my primary goals while developing NCM was to always know where my people are. For this reason, at the start of any net the assumption is that everyone is safe at home. The Latitude and Longitude of each station was geocoded from the FCC Amateur Radio database using the Google API. Other location information, the county, grid square and district are also derived from Google and other sources based on the latitude and longitude.
But the real power of NCM is its ability to use several other methods to keep station location relevant to the net in use. It does this by making multiple adjustments to the location based on values input by the logger. If the latitude or longitude is changed, the grid square is automatically adjusted. And if the grid square is changed the latitude and longitude are recalculated to the middle of the new grid square. But the best at-this-moment location information comes from the W3W and APRS_CALL fields because their location is to within a few square feet of actual.
W3W is a What 3 Words (https://what3words.com) API implementation allowing location logging to within ten square feet. APRS_CALL uses the FindU.com APRS database as source, accuracy is dependent on the settings within the stations radio beacon information. But generally comparable to W3W.
Why is all this important? During a weekly social net, location is not of prime concern. But on a deployment for storm spotting, or neighborhood damage assessment, search and rescue missions, earth quakes, fires, floods, and many others they can literally mean life and death. The NCS and logger must keep as detailed as possible location information for every operator they have in the field. Not doing so is irresponsibly not doing the job and acting in an unprofessional careless manner for the welfare of your deployed people.
The best use of W3W looks like this:
The station operator uses the smart phone What 3 Words app to find their location and then useing his radio calls it into the NCS/logger. The W3W app is free for all smart phones, requires no internet or connectivity to work.
The NCS/logger checks this location using the w3w web site to be sure the three words were received correctly.
If correct, the three words are entered into the W3W field in NCM.
In this way the most recent location will be available for reporting and mapping.
The best use of APRS_CALL looks like this:
Station WA0TJT-8 manually beacons his location via APRS, and notifies the NCS/logger he/she has done so.
The NCS/logger right clicks on the stations call-ssid information in the APRS_CALL field. Be sure to have the station’s ssid entered into NCM.
In both circumstance the information is propagated to the other location fields of NCM. They are interchangeable; you can use either method to report location information and it’s not dependent on how it was done the previous time W3W or APRS.
Time Based Tracking
Another feature of both methods is the ability to lay down breadcrumbs of each location visited. I call the individual breadcrumbs ‘objects’ they can be displayed on a map showing the changes to location of the station over time. Be sure to read the help file that discusses each of these for usage.
How Location Change Mapping Works
The mapping functionality of NCM has two sources. The first is the NetLog table which has the most current information at all times. The location showing at any given time is the most current location entered. The second is the TimeLog table which keeps track of all the details collected by NCM. When an ‘object’ is created by either the W3W or APRS_CALL method it’s also written to the TimeLog table . This gives the map the ability to show the track of the station over time starting at the first reported location all the way to the last reported location.
A FACILITY type net will automatically be created as a pre-built.
This type of net requires pre-building of the net, and its continued use for furture nets. It also requires that a group profile be created at https://net-control.us/BuildNewGroup.php, be sure to check 'FACILITY' as the kind of group. A comma delimited file of the facilities and locations (latitude & longitude) of each. An example would look like this;
groupcall, facility, latitude, longitude
KCHEART, Veterans Affairs Medical Center, 39.063357, -94.526271
KCHEART, Checkins with no assignment, ,
Check with the me if you have additional questions.
Suppose your organization is tasked with supporting a series of hospitals all over your coverage area. Additionally each hospital is expected to have an appropriate number of volunteers, some need only one some might need six. And maybe the established procedures for your groups monthly net is to log using the hospital name, with only one station responding and maybe giving all call signs for stations in attendance. Including if they are on-site or not.
This would be a difficult net for NCM to handle in its basic mode. Hospital names are too long to be a useful tactical call, some volunteers might be at home while others are at the hospital. The at hospital group would need to report the latitude and longitude using W3W or APRS to indicate the location of each station. Keeping in mind that one of NCM’s primary tasks is to have a correct and current location for every station. This alone would make logging a very difficult task.
But what if the NCS called net via hospital name, and each station logged is already showing (pre-built) grouped with that hospital? Stations actually at the hospital would only require the logger to check one option and it would show the assignment. Nothing would have to be done to the station at home. Mapping such a net, the later ICS-214 or ICS-309 would show at all times the actual location of the stations checked in.
Setting up such a net as a pre-built net would even make logging that much easier because nothing more than a right click on the 'out' turns it to a 'in'. Another column would indicate if the ham is at the station or hospital.
Maybe even a right click on the on-site field would do both duties at once. Set the 'Out' to 'In' and change the on-site to 'Yes'.
To accomplish all this two columns have been added to the net display. The 'Facility' column to show what hospital and a column called 'On Site' to indicate they are at the hospital. Sorting would keep all the hospital volunteers together on the log organized alphabetically by hospital name. Instead of the NCM default of time checked in.
This is comming soon, send me your comments and ideas.
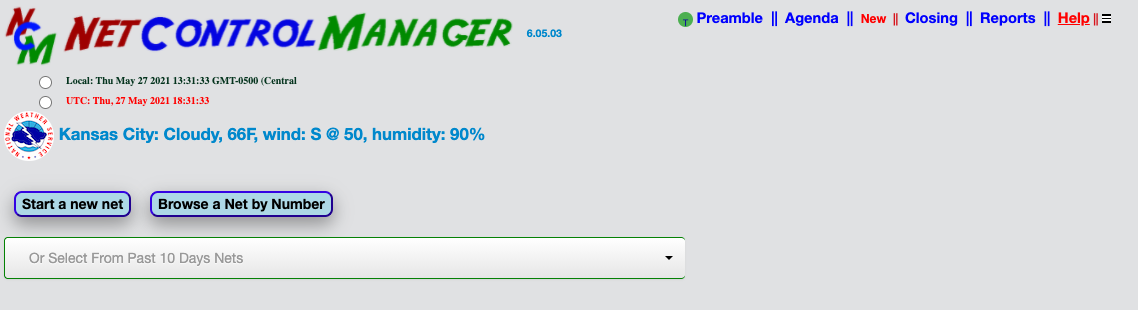
This is the first page you see when opening Net Control Manager.
Notice the green T button next to 'Preamble', click it to toggle help bubbles.
The version number here is 6.05.03 representing the sixth year of NCM the 5th month, modified on the 03rd.
A net that is already open can be displayed in two ways. The first is to use the dropdown to select your open net, it will be hilight in green or blue depending on what type it is. You can also open any net from the past if you know its net number by clicking on the blue 'Browse a Net by Number' button. To find a net number use 'Reports ==> List/Find all Nets'.
A Populated Home Page
https://net-control.us
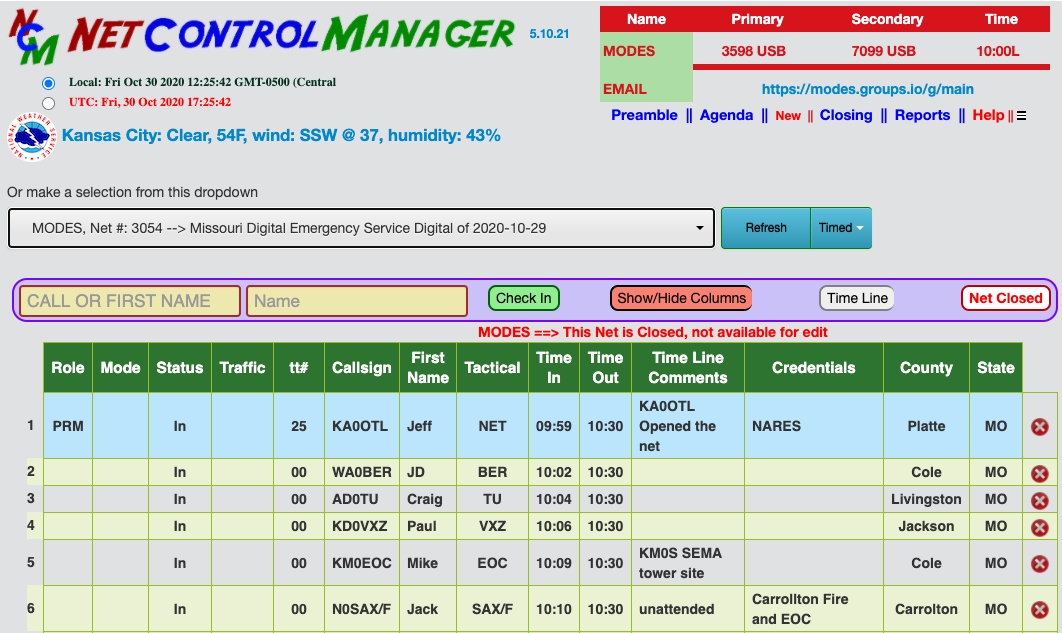
A closed net open for viewing. Notice the extra columns like; tactical, credentials and tt#. Several more are available as well, by using the orange 'Show/Hide Columns' button.
Notice the "Refresh", "Timed" and "'NetClosed" buttons, the MODES ==> ... Closed under the command bar and that all Time Out values are present.
The Local timezone is selected and the upper right corner is populated with net information.
All groups are encouraged to create a group profile to help with setup for new nets and to populate the upper right corner. Select hamburger menu ==> Select One ==> Create a Group Profile.
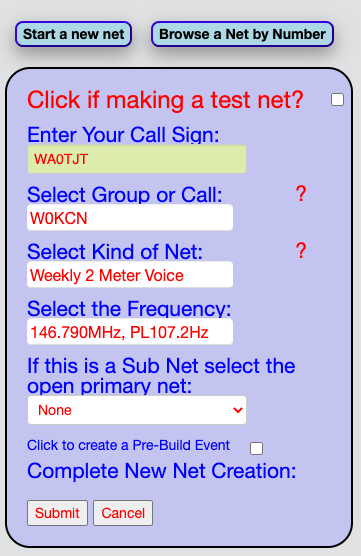
Before clicking the 'Start A New Net' button check to see that someone else has not already started the net for you. To do this,
Reload your web page
Then check the dropdown list for the net, open nets are in green. Pre-built and Roll Call nets are in blue.
If not already created then...
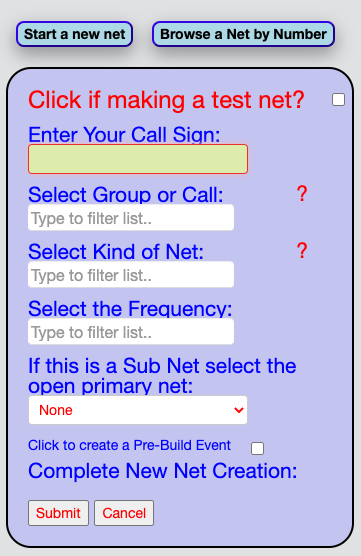
Click the blue 'Start A New Net' Button at the top of the page.
Be sure click the "test net" select box at the top if you are creating a TEST net.
Enter your call sign in the top most box, this is your personal call sign, issued by the FCC NOT the club call sign.
Select the club call sign or name from the next dropdown box, or type your own into the box. This can be a short name like 'SUMMER' (no quotes) or descriptive like 'My Birthday'.
Select the type of net. If you created your own (above) then consider choosing EVENT or Test here. Otherwise select from the dropdown.
If not already showing, select a frequency from the next dropdown box. As above you can also type in your own frequency. DO NOT PUT a colon (:) anywhere in this box.
If the net you are creating is meant to be associated with another net (making this a sub-net), the next dropdown has a list of the all the possible parent net selections.
Click 'Click to create a Pre-Build Event' if you are pre building a net for a future event.
See: Pre-Build nets for Events for more details.
Click on Submit.
At this point a new net page should be displayed, listing you as having opened it.
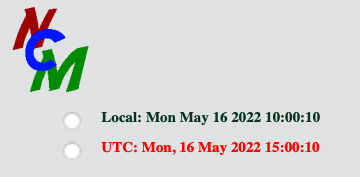
This information panel in the upper corner is title, version number, time choice and the New weather information.
By clicking the NWS logo you may select a more local weather display by providing your callsign in the requested dialog box.
All times are stored as universal time (UTC or GMT). You are able to select the local time zone for display purposes only.
The smaller corner will only appear when the monitor in use is too small for the larger display. For example on a iPad, iPhone, smart phone or just a smaller screen. See the section on Responsive Design for more information about this transformation.
Weather information will still be captured in the Time Line log.
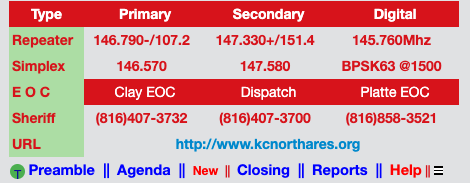
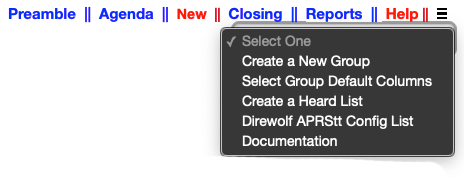
This information panel in the upper corner contains repeater and simplex frequencies and other information relevant to the group of the net that is currently open. By clicking the hamburger menu icon (three bars) an option menu will be displayed. Choose what part of this menu you want to change, create a new group, or display this document.
The New is used to edit or create Preamble, Agendas and Closing documents.
Each of the Preamble, Agendas and Closing documents can be individually edited from there individual displays.
Notice the small green button, left of the Preamble. Click this to display positioned tips to help navigate the page.
See the section on reports below for information about the reports menu.
The background color of this menu bar will change from purple to red over the course of 10 minutes. Use this as a visual reminder to do a station identification.
Entering Station call signs (There are a number of possible ways to do this.) All entries can be done with a TAB TAB TAB (triple tab) after entering a partial or full call sign only.
1) Type the call sign (or any 3 character portion of it) and wait for the hints to reveal the correct station. Then single click or arrow down on that station followed by TAB TAB TAB (triple tab). It will populate the call, the name and other fields into the appropriate locations. If it is an unknown call you MUST click Check In.
If you catch only part of a call you can use the underscore (_) as a wild card. For example if you hear KA0S?Y, missing the middle letter, enter KA0S_Y and wait for the hint. The underscore as a wild card works in any position of the callsign. It also works for multiple positions, such as __0sx, the only requirement being you still need 3 other characters. But be advised it might take longer to return a value.
2) Perhaps the best way is to enter the call sign then tab three times. The system will automatically enter the names, and additional information. If it can't find it in our DB already it will go to the FCC data base and pull the needed information. If the call sign can not be found in the FCC DB a comment is entered and both the call sign and comment will be highlighted in a yellow color.
As a short cut to entering check-ins with traffic a new smaller input field (box) has been added to the button banner, after the name field. This will require an extra tab after an entry without traffic. One more TAB to enter a call.
This little box helps the logger keep his/her hands on the keyboard while taking check-ins. Your options for entry are T,R,W,P,E,Q,A or C, they represent the action values of the Traffic column.
R --> Routine
W --> Welfare
P --> Priority
E --> Emergency
T --> Traffic
Q --> Question
A --> Announcement
C --> Comment
By entering one of these in that little box the Traffic column for that station will automatically be updated to reflect the value. Be sure to use the dropdown in Traffic to indicate 'Sent' after the traffic is passed.
The 'Refresh|Timed' button is used to set the automatic refresh time for the data on the page. Clicking the 'Timed' half gives you a dropdown of choices. Manual is the default, you have to click it each time you want a refresh. The rest should be understandable as is, every 5 seconds, etc. Suggested Usage:
If you are net control and NOT keeping the log, set your refresh to 5 seconds.
If you are the logger but NOT net control leave the default (Manual).
If you are both leave the default (Refresh or Manual).
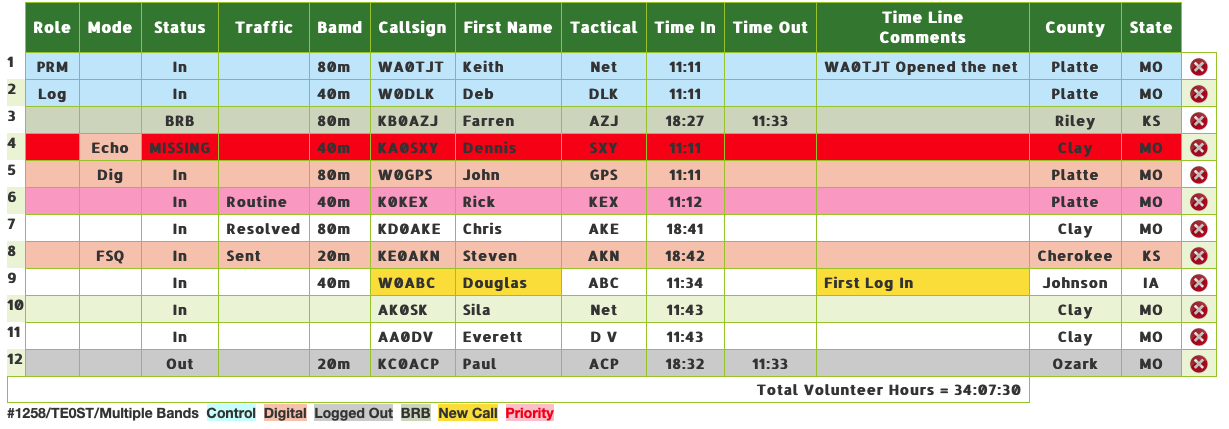
When a new station checks into one of the nets for the first time an entry will also be made to the TimeLine Log.
To delete an entry, locate the red X at the end of the row. Click on it, or on the words (Click to delete). A dialog box will open asking you to confirm.
Choose your option.
Another method if the above doesn't work is to type in all caps 'DELETE' into the 'Tactical' column. Be sure its the only thing in the cell and not adding to a tactical call. You'll know if this worked because NCM will respond with a "DELETED successfully", the row will be deleted on the next data refresh.
A delete is not undoable, if needed just add the call again.
In both cases this action is recorded in the TimeLine Log to document the deletion.
Mis-typed Call Sign
If you mis-typed a call, delete it, then simply reenter the correct call sign.
Sort Columns - Most columns can be sorted simply by clicking on the column header (name). Click once and it sorts in one direction, click again and it reverses. Any kind of refresh (page or content) returns all columns to their original order. An exception to this is sorting by District. When you sort by District it also sorts the County and State fields to keep them in alphabetical order as well.
You can always return to the default sort order by clicking the blue 'Refresh' button.
The default sort is a somewhat complex algorithm that took a while to figure out. Basically its sorted first by the control stations, starting with the primary net control station, followed by the logging station. It seemed logical to keep them at the top. At the same time it seemed logical to move the checked-out stations to the bottom. The exception to this is a control station that has checked-out. I left them with the other control stations in case its status was in question. All others are then sorted by the time of check-in. They are recorded to the second but only displayed to the minute.
Close Net - Clicking this button should be the last thing the NCO or logger does at the end of a net. After asking who (enter your call sign) is closing the net it populates the Time Out fields and calculates the Total Volunteer Hours at the bottom of the table. It does not reset any log out times that may already be indicated. Total Volunteer Hours are calculated to the second from log-in to log-out times. You are automatically taken to the ICS-214 report after closing a net.
To re-open a closed log, where the time out is showing, RIGHT click the 'Net Closed' button and confirm. Be advised however that this resets all entries (except those already checked out) for timeout to NULL. There is no current method to reset the time out by station. I'm working on it. Contact me if you have an issue or need help.
If you are just looking at a past log or the current log, you may just leave the page, or close the page. But please DO NOT use the Close Net button again.
Browse a Net by Number - This function is in the 'Reports' menu in the upper right corner of the main page.
Export CSV - A link to this feature is at the bottom of every net displayed on the screen, both open and closed, new and old nets.
In general rows will appear in alternating white and light green, in ledger style..
Row Colors Based on ROLE
LIGHT BLUE - These are the control station(s) for the net, based on Role.
Row Colors Based on MODE
SALMON - All digital station, unless it is a digital net. Then they appear in the default colors (green/white). The Mobile and HT options appear in the ledger mode.
Row Colors Based on STATUS
GREY - These are the station that have already checked out of the net, or they were In-Out at check-in.
Red (Missing) - Any station that fails to come back to a roll call should be marked this way. This is a nemonic to double check your people and be sure they are safe. During and after a net.
BRB, army green - Be Right Back... Any station that is temporarily leaving the net.
In-Out, Grey - Any station that wishes to only check in then immediately check out again. His Time On Duty will be set to one minute.
Enroute, No color - Station is headed to a location/assignment.
Assigned, No color - Station is given assignment but not yet enroute.
Row Colors Based on TRAFFIC
RED - Any station with pending traffic is shown in red, after the traffic is passed change the dropdown to 'Sent' to indicate the traffic has been passed. The red color highlighting will go away. Be sure to select from the dropdown the appropriate category of traffic (Priority to Routine, & Question).
Callsign Cell Colors Based on CHANGES
ORANGE - An orange background on the callsign cell is an indication of a location change. The change may have been due to any one of the many ways to change location based on the latitude and longitude.
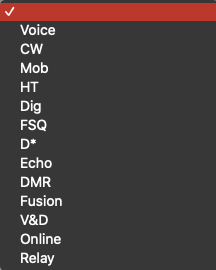
The Mode dropdown indicates the type of operation the station has logged in with
Editable: Yes
Splitable Field: No
Required Column: Yes
Edit Type: Dropdown
Right Clickable: No
DB Variable: Mode
blank - This is the default
Voice - Voice
CW - Morse Code
Mob - Mobile
HT - Hand Held device
Dig - This person is using or is the digital station
D* - D-Star station
Echo - EchoLink station
FSQ - FSQ or FSQCall Operation
Winlink - Winlink or PAT
DMR - Digital Voice
V&D - Checked in with both Voice & Digital. Somewhat specialized for nets doing both voice and digital operations, such as a digital training net.
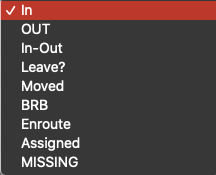
STATUS
Status is an indicator of the stations immediate availability
Editable: Yes
Splitable Field: No
Required Column: Yes
Edit Type: Dropdown
Right Clickable: Yes A right click changes any value to 'In' and any 'In' to 'Out'
DB Variable: active
IN - Checked in and available, the default
OUT - Station has checked out of the net
IN-OUT - Station is checking in and immediately checking out. One minute is recorded in TOD.
BRB - Be Right Back, out for a short time, i.e. a bio-break.
MSSING - This person failed to respond to the last roll call
Enroute - This operator is on their way to a location.
Assigned - The station is assigned to something, NCS decide.
Moved - The station has moved to another frequency or net, NCS decide.
Leave? - Want to leave the net? Ask permission by selecting this value.
Traffic Indicates the station has traffic, and what kind
Editable: Yes
Splitable Field: No
Required Column: Yes
Edit Type: Dropdown & Short Cut from the button bar
Right Clickable: YES, See below for details.
DB Variable: traffic
Use Right Click as a short cut to change the value after an option has been completed.
Use the column dropdown to make any other change needed.
Possible Values
The Value After A Right Click
Traffic
Sent
Routine
Sent
Priority
Sent
Welfare
Sent
Emergency
Sent
STANDBY
Resolved
Question
Resolved
Announcement
Sent
Bulletin
Sent
Comment
Sent
Resolved
STANDBY
Sent
STANDBY
Blank
STANDBY
Use Routine if in doubt. Blank indicates no traffic, change choice to 'Sent' after traffic has been sent.
As a short cut to entering check-ins with traffic a new smaller input field (box) has been added to the button banner, after the name field.
This does require an extra tab after an entry without traffic. TAB TAB TAB to enter a call.
This little box helps the logger keep his/her hands on the keyboard while taking check-ins. Your options for entry are T,R,W,P,E,Q,A or C, they represent the action values of the Traffic column. R --> Routine, W --> Welfare, P --> Priority, E --> Emergency, Q --> Question, A --> Announcement, C --> Comment. By entering one of these in that little box the Traffic column for that station will automatically be updated to reflect the value. Be sure to use the dropdown in Traffic to indicate 'Sent' after the traffic is passed.
Editable: Yes
Splitable Field: No
Required Column: No
Edit Type: click
Right Clickable: Yes, Right Click on Header only to hide the column
Right Click on the onsite header to show the Facility column.
DB Variable: facility
The Facility column stores the name of the facilities that will cause an auto sort by there name. See: All About FACILITY Nets
On Site
Editable: Yes
Splitable Field: No
Required Column: No
Edit Type: click
Right Clickable: Yes, Right Click on Header only to hide show the Facility column.
DB Variable: onsite
The OnSite field indicats with 'Yes' or 'No' that the station is present at the facility in the previous column.
See: All About FACILITY Nets
Editable: Yes
Splitable Field: No
Required Column: No
Edit Type: click
Right Clickable: No
DB Variable: tt
# This is the APRStt number assigned to this station on this net. Only 0-99 are APRStt usable.
See: What is APRStt?
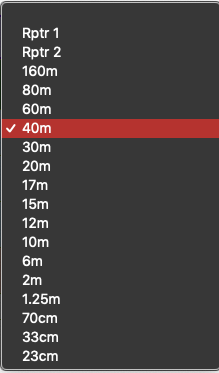
Band
Band this station has checked in from.
Editable: Yes
Splitable Field: No
Required Column: *No * Except for 'Multiple Bands' and '80/40 Meters' frequency choices.
Edit Type: dropdown
Right Clickable: No
DB Variable: band
Editable: *No * Except for pre-built/roll call nets.
Splitable Field: No
Required Column: Yes
Edit Type: *N/A * In pre-built/roll call nets, click to edit.
Right Clickable: Yes on header, and individual cells
Double Clickabel: Yes, this is used for DX only callsigns. It looks up a fills default information (lat & lon etc.)
DB Variable: callsign
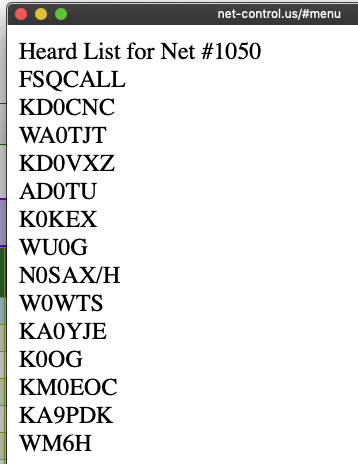
Right clicking on the column head 'Call Sign' creates a heard list of this net. This same functionality is available by selecting the hamburger menu (right of Help in upper corner) and selecting 'Create a heard list'. A variety of different formats is created. Copy/Paste the one you want.
The background of the callsign cell will turn orange colored if there has been a change to any of the location variables that also changes the latitude and longitude. This would be important during an emergency to know if a station is at home or in the field.
Individual Call Sign Right Click
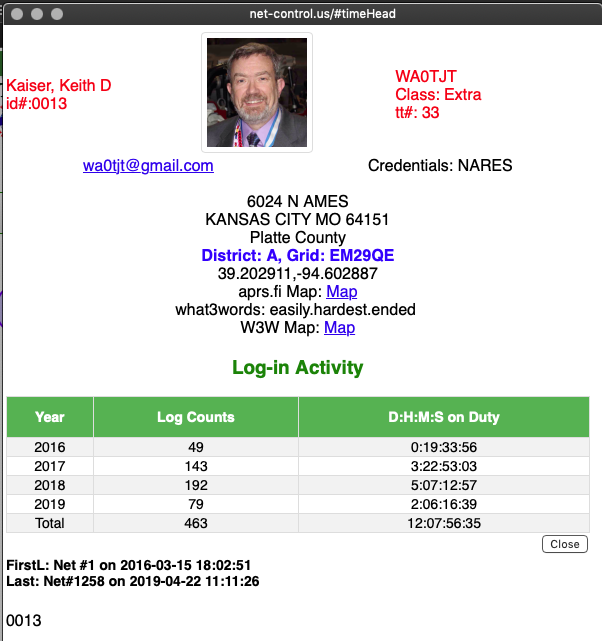
Right clicking on the call sign displays a floating, modal report showing details of this stations net operations.
The use of a head-shot picture is optional, let me know via email if you want it.
Editable: Yes
Splitable Field: No
Required Column: First: Yes, Last: No
Edit Type: click
Right Clickable: No
DB Variable: Fname Lname
First Name is the operator's first name. Last Name is a separate column. Both names are editable, by doing this they are updated on screen and stored in the stations table.
TACTICAL
Editable: Yes
Splitable Field: Yes with two spaces
Required Column: Yes
Edit Type: click
Right Clickable: No
DB Variable: tactical
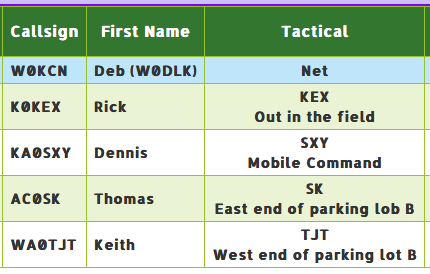
The use of Tactical Calls at Public Service Events is becoming more and more common place and it is legal. The use of tactical calls can and does increase the efficiency and speed in identifying a specific function or person. They also eliminate confusion when working with other agencies that have no idea what amateur radio call signs are or mean. Using “ Rest Stop 1 from Net Control” is a lot easier and to the point than “WA0TJT this is KC0BS.” The assignment of a tactical call should, if possible, relate to the amateurs function at the event. Tactical calls such as “Sag 1, Aid Station 4, Police 2, First Aid, Logistics” and so on provide a verbal “picture” of the function.
Sometimes a tactical call by location is not the best solution, 'West end of parking lot B' for example. In this case its easier to just use the call sign default suffix such as 'TJT'. But for the NCS to remember where 'TJT' is located becomes more difficult. Putting that information in the comments line is problematic because you may need to use that field for a report from 'TJT. Which would then blank out the tactical postion information.
For the best of both worlds NCM allows for multiple lines within the Tactical field. Any thing entered after the initial tactical call 'TJT' followed by two spaces becomes a second line in the Tactical field. Now you can have a tactical of 'TJT' and below it in the same box it might say 'West end of parking lot B'. You might find it advantageous to put the job title first, for example 'SAG 1', then the 'TJT'. Just don't forget the two spaces.
Editable: Yes
Splitable Field: No
Required Column: No
Edit Type: click
Right Clickable: No
DB Variable: phone
Phone number including country code (optional) and the area code, any readable format is acceptable. This is an editable field and will be stored in the stations table for later use.
eMail
Editable: Yes
Splitable Field: No
Required Column: No
Edit Type: click
Right Clickable: No
DB Variable: email
eMail address of this station. This is an editable field and will be stored in the stations table for later use.
Editable: *Yes * Also changes latitude and longitude.
Splitable Field: No
Required Column: No
Edit Type: click
Right Clickable: Yes on individual cells
DB Variable: grid
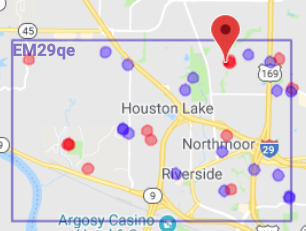
This is the Maidenhead Grid Sqare location of the operators home station and will be added automatically by the system. Any changes made to this field will also result in an update to the latitude and longitude fields.
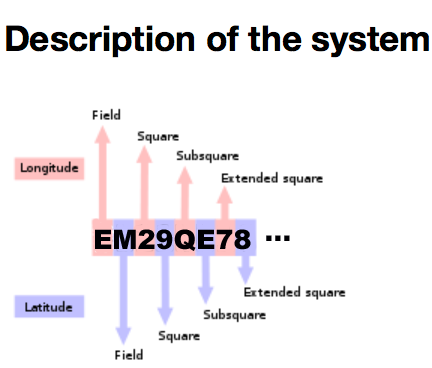
A Maidenhead locator compresses latitude and longitude into a short string of characters. The position information is presented in a limited level of precision to limit the amount of characters needed for its transmission using voice, Morse code, or any other operating mode.
The chosen coding uses alternating pairs of letters and digits, like so:
EM29qe78
In each pair, the first character encodes longitude and the second character encodes latitude. These character pairs also have traditional names (see diagram), and in the case of letters, the range of characters (or "encoding base number") used in each pair does vary.
Editable: *Yes * Also changes the GRID.
Splitable Field: No
Required Column: No
Edit Type: click
Right Clickable: No
DB Variable: latitude
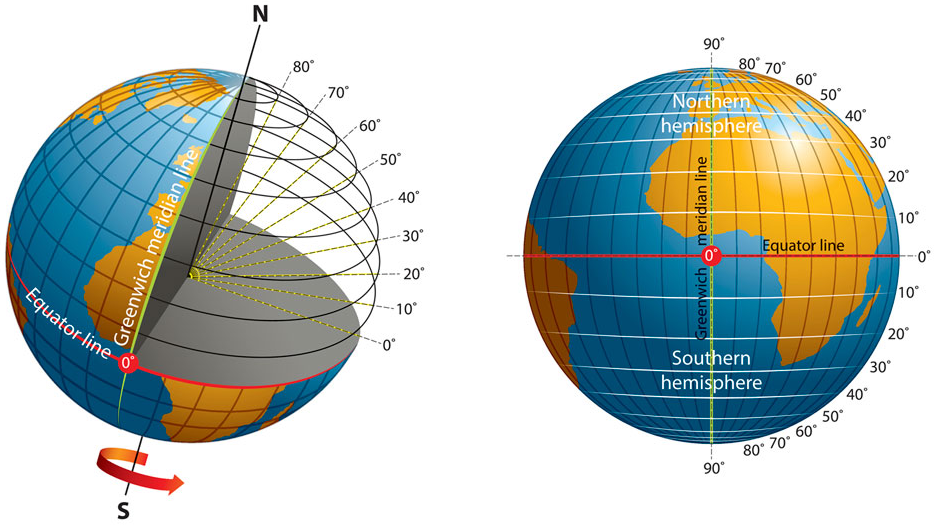
Latitude of this station. The angular distance of a place north or south of the earth's equator, or of a celestial object north or south of the celestial equator, usually expressed in degrees and minutes.
Editable: *Yes * Also changes the GRID.
Splitable Field: No
Required Column: No
Edit Type: click
Right Clickable: No
DB Variable: longitude
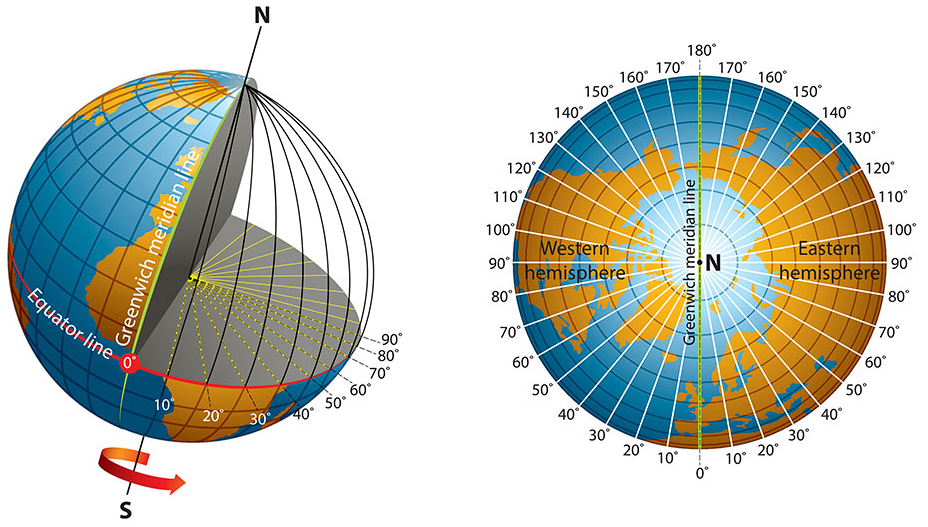
Longitude of this station. The angular distance of a place east or west of the meridian at Greenwich, England, or west of the standard meridian of a celestial object, usually expressed in degrees and minutes.
Editable: No
Splitable Field: No
Required Column: Yes
Edit Type: Automatic
Right Clickable: No
DB Variable - Time In: logdate
DB Variable = Time Out: timeout
Time In - The time the station was added to the data base and is not editable.
Time Out - The time the station was shown 'OUT' of the net. This would also reflect any In/Out or BRB out times as well. This value is editable but you'll have to ask me for the how.
Both values can be show in local time by selecting that option in the upper left corner of NCM.
Back to the Index
Time Line Comments
Editable: Yes
Splitable Field: Yes with two spaces or use the <br> HTML tag
Required Column: Yes
Edit Type: click
Right Clickable: Yes, Brings up the 'Individual Activity Log (ICS-214A)' Report.
DB Variable: comments
Time Line is used to enter any comments or reports made by this station. They are then populated into the TimeLine Log table. Each comment is individually entered into the timeline log for reporting in the ICS reports. Each click in this field clears the previous entry, but it has been saved. Changes to several of the column values are also logged here.
The 'Search Comments: Search for numbersonly' and its associated 'Search' button is for searching numbers only. For example: You're working a marathon and they need each ham along the way to record the bib numbers of the runners as they pass. So you might enter "bib:15" into the 'Time Line Comments field', then maybe "bib:21", and so on. By entering "21" into the search fild all records relating to bib 21 will be displayed. This is not a perfect solution but it has been used a couple of times with success. Give it a try.
Right clicking in one of the cells will produce a chronological listing of all the entries for this station.
Editable: No
Splitable Field: No
Required Column: No
Edit Type: Calculated at station log out and end of net
Right Clickable: No
DB Variable: timeonduty
Editable: Yes
Splitable Field: Yes with two spaces
Required Column: No
Edit Type: Click
Right Clickable: No
DB Variable: creds
CREDS or Credentials - Shows this station operators credentials (if known),i.e. ARES, RACES, etc.
For the best of both worlds NCM now allows for multiple lines within the Credentials field. Any thing entered after the initial credential i.e. 'KCHEART' followed by two spaces becomes a second line in the Creds field. Now you can have a credential of 'KCHEART' and below it in the same box it might say 'St. Lukes Northland'. More lines are possible if needed, simple use two spaces for the next line.
This is an editable field and will be stored in the stations table for later use.
Editable: Yes
Splitable Field: No
Required Column: No
Edit Type: Click
Right Clickable: County Yes, City No, State No, District Yes --> looks up and fills the missing district.
DB Variable - County: county
DB Variable - State: state
DB Variable - City: city
DB Variable - Dist: district
Shows the County, State and Highway Patrol District or ARRL District -- For some Nets these are already shown.
Right Click County
Right clicking on the county name will display a Google map of that county.
what3words is an easy way to talk about any precise location in the world. It gives every 3m x 3m square (10 sq/ft) a unique combination of three words: a what3words address.
A what3words address is more precise than a street address, and many people find three words easier to remember and say than GPS coordinates, grid references or latitude and longitude.
The station profile accessed by right clicking a call sign now shows the what3words address based on the latitude and longitude of the record clicked. The what3word address will change based on that lat/lon combination.
Adding or changing this field also changes the latitude, longitude and grid columns. Additionally the nearest cross roads will be added to the W3W column and documented in the Time Log.
The W3W field also allows for an additonal comment to be added after the three words. For example you might enter 'spray.shudder.opting Telephone pole in yard' (no quotes). The field in the net log after a data update would then reflect;
spray.shudder.optiong N Ames Ave & NW 57 Ct'
with the nearest crossroads. But in the Time Line you would see this;
LOCΔ:W3W:OBJ: spray.shudder.opting -> Cross Roads: N Ames Ave & NW 57 Ct (39.198159,-94.601576) Telephone pole in yard
Basically, it treats the entry similar to an APRS object, multiples entries for the same reporting station can then be reported as a neighborhood or a much more local area.
NOTE to Loggers:
I highly recommend that before you enter a what 3 words into NCM you first check it at https://what3words.com to be sure you heard it correctly. Only after validation add it to NCM, you may find this will save you some time.
Editable: Yes
Splitable Field: No
Required Column: No
Edit Type: Click
Right Clickable: Yes
DB Variable: APRS_CALL
The best use of APRS_CALL looks like this:
1. Station WA0TJT manually beacons his location via APRS, and notifies the NCS/logger he/she has done so.
2. The NCS/logger right clicks on the stations call-ssid information in the APRS_CALL field. Be sure to have the station’s ssid WA0TJT-1 entered into NCM.
The information is propagated to the other location fields of NCM. They are interchangeable; you can use this method to report location information and it’s not dependent on how it was done the previous time using W3W.
Editable: Yes
Splitable Field: No
Required Column: No
Edit Type: Click
Right Click: No
DB Variable - country
Full country name. This is an optional column, a blank will usually mean its U.S.A. but it could also mean that the country information has not been entered. See Callsign for more information about using the double click to enter this. But it can also be entered/edited in the usual way.
NCM is equipped with 23 unique columns of information that make up its primary table. Thirteen of these are optional and may not be showing by default. Each group (KCNARES, PCARG, CARROLL, etc.) has a default display that may include one or more of these optional columns. But it is also possible for each user (like you) to see part or all of the optional columns by simply clicking the orange SHOW/HIDE Columns button in the menu bar. Click the box next to each column you want to see or un-click any you don't want to see. Then click the 'Save to Cookies' button, on the next table refresh your optional columns will be displayed or hidden depending on your selection.
If your group would like to have a different set of defaults than what currently comes up, please email me with your selections, or take a screenshot of the above referenced box, and I'll set them up for you. In the future this will be an optional setting your group can make itself.
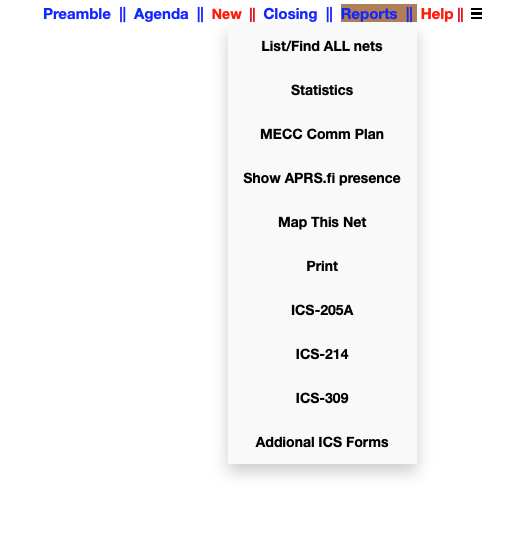
Preamble - selected Net, displays a modal box. Agenda - selected Net and any indicated as ALL, displays a modal box. New - Displays the editor for creating the Preamble, Agenda and Closings. Closing - Specific to the selected Net, displays a modal box. Reports - Select one of the following from this dropdown List/Find All Nets - List every net, with an option to print the ICS-214, ICS-309 or to map the stations. Statistics - Another manual is needed for this. Try it out... MECC Comm PlanShow APRS.fi presenceMap This NetPrint - Is the better print report option. It will be displayed as a web page. Use your browser to email it, create a PDF, or print the page. ICS-205AICS-214 - Is the official ICS-214 report form. It will be displayed as a web page. Use your browser to email it, create a PDF or both. ICS-309Addional ICS Forms Hamburger -A dropdown with additonal functionality.
Create A New Group
Select Group Default Columns
Create A Heard List
Direwolf APRStt Config List
Documentation
Between the list of nets dropdown and the Call Sign entry box is a General Comments field. To make it visible hover your cursor over the open space between these two fields. A yellow box will be displayed capable of any amount of text you paste or type into it. Anything entered in this field is timestamped and put into the Time Log table for this log. It only remains visible in this box to the person who entered it.
Why would you want this? Suppose you open a 'Stand By' net for weather. After opening the net add a remark in this field indicating it is stand by only. When the net goes official (NWS asked for a net) add another note that says it is now an official weather net. Both entries will appear in the Time Log and will indicate exactly when it switched between stand by and official. This way moving from a stand by to official net will not require starting a new net.
USING Sub NETS
Suppose you open an emergency net for a large tornado or maybe a seismic event. Because of the number of jurisdictions it might become difficult for one net control operator to support the entire group of stations, or for message handling purposes he/she may ask one or more stations to break off and start a new net for their jurisdiction or a specific need.
It would be nice however if the nets were connected, reportable as one after the event. In this case while creating the new net the additional net control operator can select in the procedures to link this net to the original. The dropdown box (at the bottom of the new net dialog) for this will only indicate the eligible nets to link with. Select the parent of the net being created.
At the bottom of all nets is a reference line, similar to this . Studying this you'll see that the first item is the net number the second is the call sign of the currently open net (#795/TE0ST). Followed immediately by ether "Has S/N: 797, 798" if it is the parent net. Or "S/N of: 795" if it is one of the child (sub) nets.
All nets created in this manner are stand alone nets with their own net control operator (NCO), however they can all be opened in separate tabs of your browser.
If you just want a peek at one of the other nets, parent (if you are the child) or child (if you are the parent) simply click this list and they will display at the bottom of your net. They are NOT editable.
This may seem very confusing until you try it.
Another more common variation of this sub menu is:
This is the primary source for the ICS-214 & ICS-309 Reports
The TimeLine Log table is not directly editable by the user. It is used as a log of the activities that take place on the primary net control table. Information is logged with a timestamp of when it happened, who posted or what station was affected and the action taken.
Examples of logged actions include any time the Role, Mode, Status, or Band is changed, the action is logged in the Time Log table. This makes it possible to track who was running the net at the any given time. This might be important if authorities need additional information about something that happened at a certain time.
The Timeline Log is also updated anytime a comment or report is added to the 'Time Line / Comments' field on the primary net control page. This makes it very simple to record incoming information from a specific station.
Additionally the TimeLine Log reports any change of location of the subject station. The 'Report' field of the log might begin like this "LOCΔ:" this means 'Location Change (delta)' the next field after the colon would tell you where the change was made i.e. COM for comments, W3W for the What3Words column, LAT for latitude and LON for longitude, G for grid.
Use Time Line Comments to indicate that Message #xx was sent. No need to put the entire message in, just reference its number. Now a record exists showing when the message arrived and when it was sent and what message it was. But if it is more appropriate for the situation, you can copy the entire message into the Comments field or the general comment field.
Time Log also records any information added to the General comment area of the net control panel. If the net goes on for a significant time (hours) it might be appropriate to copy the weather information to this location occasionaly.
Most ARES/RACES type groups require ICS 100 and ICS 700 certification for credentialing. Click National Incident Management System for more information.
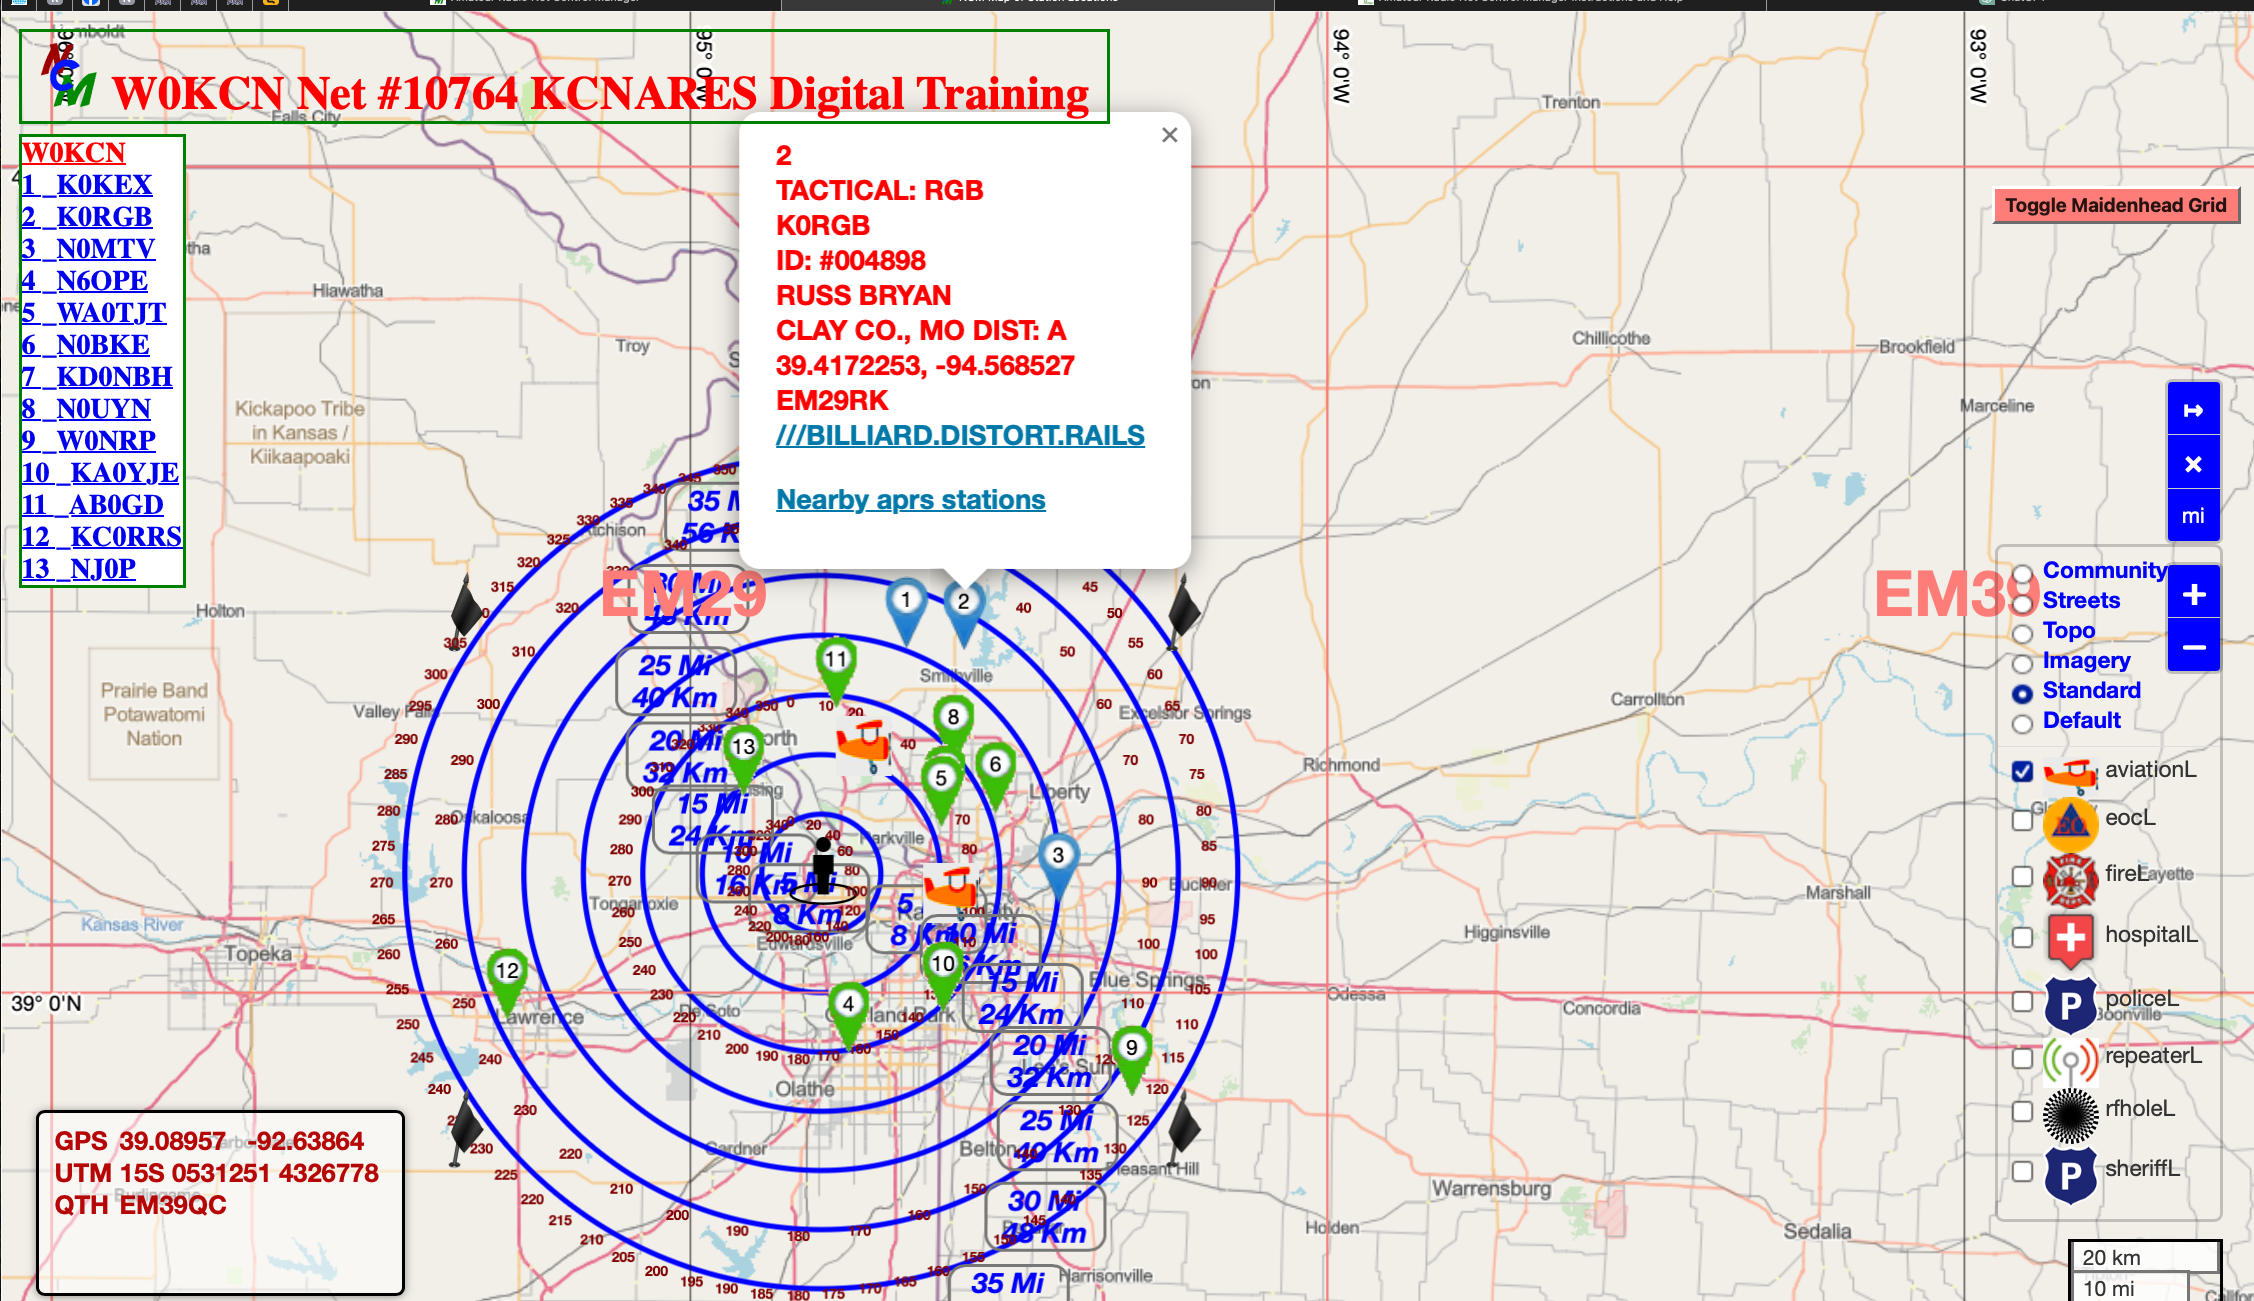
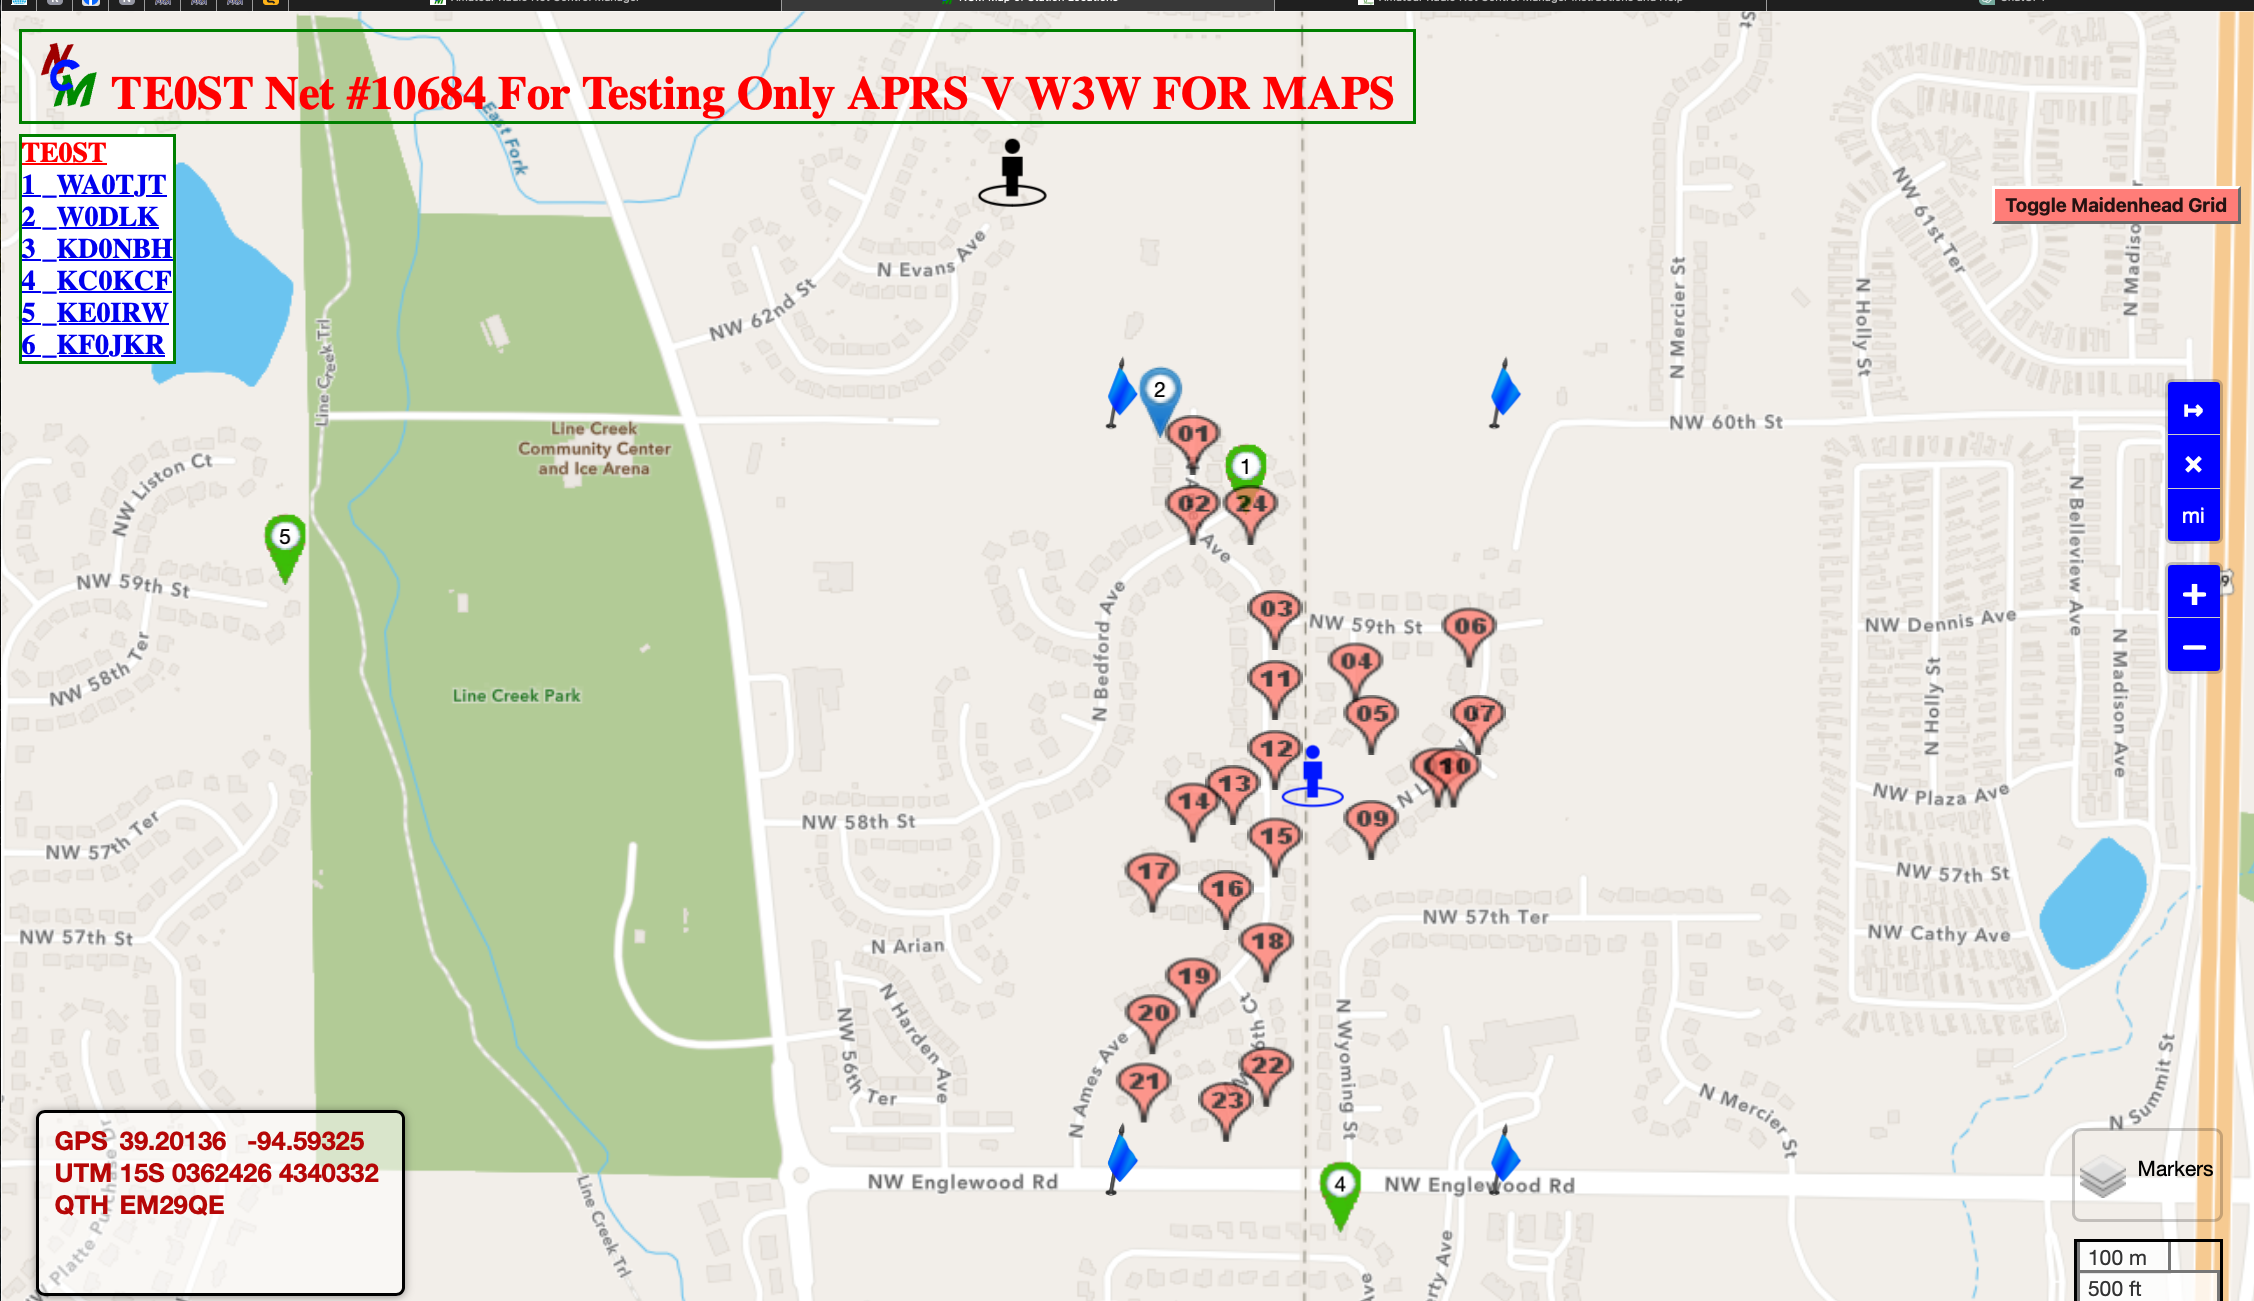
Suppose you open an emergency net for a large tornado or maybe a seismic event. Because of the number of stations wanting to check into the net it sometimes becomes impossible to know where everyone is located. Wouldn't it be nice if you could put each stations location on a map? Well now you can.
One method would be to use the APRStt system using a Direwolf TNC by WB2OSZ, and based on work by WB4ABR
In the 'Reports' dropdown in the upper right corner you can select 'Map This Net'. When selected a map will appear with markers for each station logged into the net. In the lower right corner is a list of Points of Interest that will optionally display various public location that may be of interest to your net. The POIs must first be added to the system, to do this requires a CSV file which will be detailed below.
In addition to the POI's it is also possible to use any marker on the map as a center point to a series of expanding circles with bearing markers for distance and direction needs. To activate this right-click on any marker, two dialog boxes will open asking for the distance between circles and then how many. I suggest you accept the defaults, and adjust only if you don't like the results. See below for an example.
Features Include:
List of stations, clicking a marker will display the information box above it.
W3W: A click anywhere on the map will display the What3Words address for that location
Mouse activity will change the latitude/longitude and grid location
Mileage between points can be determined via the 3 blue boxes on the right, click to explore.
The + and - zoom the map.
Select Imagery (satellite) or street maps.
The station markers can be hiddent by clicking off the Stations list. Control operator station markers are in Blue, the rest in green.
Points of Interest are available. See below for more details. Click to activate your choices. Detail information about the POI will appear when you click the POI marker.
Clicking anywhere within the circles will hide the circles but leave in place the bearing and distance markers.
A RF Hole is defined as a place where you can't hear your repeater or the coverage is poor, noisy, or in & out. To accomidate these transient location an entry form has been created https://net-control.us/AddRF-HolePOI.php. These are displayable from the Point of Interest list on the map. All RF Hole POI's will expire 120 days after there creation date.
The second map illustrates how using APRS Call or What3Words will create a map similar to a bread crumb map. This would be appropriate for use during neighborhood assesments, search & rescue and other situations where one or more hams will be required to show multiple locations. When this is in use each ham will have there own bread crumb map on the primary map.
To add points of interest create a CSV file with the headers in the below example. There is no limit to the number you can have but try and be reasonable, even a couple hundred would be OK if you have need.
Example...
class, Type, name, county, address, city, latitude, longitude, grid, tactical, callsign, DGID, mode, Notes
Sheriff,,"Northmoor Police Department", Platte, "2039 NW 49th Terrace", "Northmoor MO 64151", 39.183487, -94.605311,,NRTPD,,,,
End Example...
Column 1 - class:
Class: Your options are Hospital, Repeater, EOC, Sheriff, SkyWarn, Fire. If you need something else go ahead and use it but keep it to one word. 'Sheriff' should be used for any law enforcement agency.
Column 2 - Type:
type: If the class is repeater please indicate what kind of repeater i.e. AWS, Fusion, DMR, Analog.
Column 3 - name:
name: "Northland ARES Platte Co. EOC" for example and be sure to enclose it with double quotes ( " " ).
Column 4 - county:
county: The county it's in.
Column 5 - address:
address: This should be the street address without the city or zip. Be sure to enclose in double quotes.
Column 6 - city:
city: The city name, state and zip code. Be sure to enclose in double quotes.
Column 7 - latitude:
latitude: This MUST be in dd.ddddd (digital) mode 39.12345. Use Google Maps if you need.
Column 8 - longitude:
longitude: This MUST be in dd.ddddd (digital) mode -094.12345. Use Google Maps if you need.
Column 9 - grid:
grid: The maidenhead gridsquare location of the point. You may leave this blank.
Column 10 - tactical:
tactical: Use something simple, consider the callsign (if the location has one).
Column 11 - callsign:
callsign: The ham callsign, if there is one. May be left blank.
Column 12 - DGID:
This is the Yaesu Digital Group ID number for Fusion. However if you use DMR you might consider using your Code Plug name instead.
Column 13 - mode
mode: Is the repeater Digital, AMS on Demand, or Analog. Be sure to enclose in double quotes. May be left blank.
Column 14 - Notes:
notes: Anything you want them to say. Be sure to enclose in double quotes. May be left blank
Responsive Web Design makes your web page look good on all devices (desktops, tablets, and smart phones).
Responsive Web Design is about using HTML and CSS to resize, hide, shrink, enlarge, or move the content to make it look good on any screen:
I have chosen to build NCM in this way. This means if you look at NCM on a iPad it might look different (slightly) than it does on your 22 inch monitor. It for sure will look different on your Android or iPhone. But there is only so much I can do to make NCM a usable application on your iPhone. I see it more as a reference app because doing any real editing will be tricky. But it can be done.
Give it a look on your favorite smaller device. Or just grab the corner of your browser and shrink the window until you notice the differences.
MARS Net Differences
NCM was modified slightly to better support the MARS or Military Auxiliary Radio System. Some default columns, not needed by typical MARS nets were hidden, while new columns were added. Most notably a TRFK-FOR column was added. This value is meant to be used to indicate the station checking in has traffic for the TRFK-FOR station.
To make check in processing even quicker, the 'Name' field on the button bar is changed to 'Traffic For:', values added here at check in are added to that field. In addition the 'Status' column will be changed to show 'Routine' traffic.
If your non-MARS group thinks it would like to utilize this functionality let me know via groups.io and we can talk.
Data for use in NCM is maintained by a MySQL database.
Tables in NCM:
counties
Stores the state and county names for all 3144 U.S. counties.
events
Stores the Preambles and Closings for all groups who have created same.
HPD
Stores the district name or number by county within state. Not all are included.
NetKind
Stores the type of net (ARES, Group, Social...) for each group along with the default frequency, kind of net (DMR, Weekly, Digital...) and all of the upper right corner information all for the groups who have chosen to provide same.
NetLog
Stores the net details and changes for all nets.
poi
Stores all the points of interest for groups who have supplied a list.
stations
Stores information about each station that has been recorded in a net. This inclues any station that might have been deleted from any net and all international stations as well. callsign, tactical, Name, lat/lon, grid, county, state district and many more ites.
TimeLog
Stores the history of all nets by netID, date and net callsign.
Proud recipient of the Mo-Kan Regional Council of Amateur Radio Organizations, Eagle Award
International (DX) station information compliments of Daniel Bateman, KK4FOS with Buckmaster International, LLC
Guarantees or Warranties:
No Guarantees or Warranties. EXCEPT AS EXPRESSLY PROVIDED IN THIS AGREEMENT, NO PARTY MAKES ANY GUARANTEES OR WARRANTIES OF ANY KIND, EXPRESS OR IMPLIED, INCLUDING, BUT NOT LIMITED TO, ANY WARRANTIES OF MERCHANTABILITY OR FITNESS FOR A PARTICULAR PURPOSE, WHETHER ARISING BY OPERATION OF LAW OR OTHERWISE. PROVIDER SPECIFICALLY DISCLAIMS ANY IMPLIED WARRANTY OF MERCHANTABILITY AND/OR ANY IMPLIED WARRANTY OF FITNESS FOR A PARTICULAR PURPOSE.
Scire ubi aliquid invenire possis ea demum maxima pars eruditionis est,


 . Studying this you'll see that the first item is the net number the second is the call sign of the currently open net (#795/TE0ST). Followed immediately by ether "Has S/N: 797, 798" if it is the parent net. Or "S/N of: 795" if it is one of the child (sub) nets.


 International (DX) station information compliments of Daniel Bateman, KK4FOS with Buckmaster International, LLC